How do I view APU in Claim Management?
| 1. |
Login to your account using your current username and password. |
|
| 2. |
Click on the Asset / Lease Management Tab. |
 |
| 3. |
Hover on Claim Management. |
 |
| 4. |
Select the APU tab. |
 |
| 5. |
Select Client. |
 |
| 6. |
Go to the end of that row and click on the view icon. It will open a new window. |
 |
How do I add APU in Claim Management?
| 1. |
Login to your account using the username and password provided. |
|
| 2. |
Hover on Asset / LeaseManagement tab. |
|
| 3. |
Hover on Claim Management. |
|
| 4. |
Select the APU tab. |
|
| 5. |
Select the client in the dropdown |
 |
| 6. |
Select the data in the grid which you want to claim |
 |
| 7. |
Click on View icon at the end of the grid table. It will open in a new window. |
 |
| 8. |
Click on the Add button to add the claim. It will open in a new window.
Notes: Once you click on the Add button the row is added. |
 |
| 9. |
Click on the Edit button to fill the details. |
 |
| 10. |
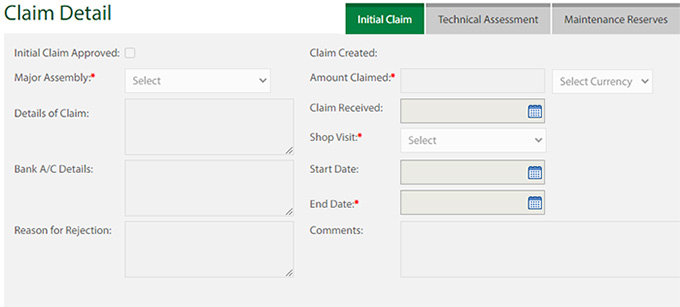
Fill the details for the Initial Claim / Technical Assessment / Maintenance Reserves tab with Approved step by step. |
 |
| 11. |
Click on the Save button once you fill the required data. |
 |
| 12. |
After the Save, button click the popup will come with a successful message. |
 |
How do I edit APU in Claim Management?
| 1. |
Login to your account using the username and password provided. |
|
| 2. |
Hover on Asset / LeaseManagement tab. |
|
| 3. |
Hover on Claim Management. |
|
| 4. |
Select the APU tab. |
|
| 5. |
Select the client in the dropdown |
|
| 6. |
Select the data in the grid which you want to claim |
|
| 7. |
Click on View icon at the end of the grid table. It will open in a new window. |
|
| 8. |
Select the row in which you want to edit the claim. |
|
| 9. |
Click on the Edit button to edit the details. It will open in a new window. |
|
| 10. |
Edit the details for the Initial Claim / Technical Assessment / Maintenance Reserves tab with Approved step by step. |
|
| 11. |
Click on the Save button once you fill the required data. |
|
| 12. |
After the Save, button clicks the popup will come with a successful message. |
|
How do I delete APU in Claim Management?
| 1. |
Login to your account using the username and password provided. |
|
| 2. |
Hover on Asset / LeaseManagement tab. |
|
| 3. |
Hover on Claim Management. |
|
| 4. |
Select the APU tab. |
|
| 5. |
Select the client in the dropdown |
|
| 6. |
Select the data in the grid which you want to claim |
|
| 7. |
Click on View icon at the end of the grid table. It will open in a new window. |
|
| 8. |
Click on the Delete button to delete the row. |
 |
| 9. |
It will open a Popup message. Click on OK. |
 |
| 10. |
Another Popup message will be open. Click on OK. |
|
How do I filter the audit trail of Claim Management?
| 1. |
Login to your account using your current username and password. |
|
| 2. |
Click on the Asset / Lease Management Tab. |
|
| 3. |
Hover on Claim Management. |
|
| 4. |
Select the APU tab. |
|
| 5. |
Select Client. |
|
| 6. |
Go to the end of that row and click on the view icon. It will open a new window. |
|
| 7. |
Click on the Audit Trail button. It will open the Audit Trail page in a new window. |
 |
| 8. |
Select filter types to filter the Audit Trail Report. Like filter by keyword, filter by operations, filter by date, filter by client, etc. |
 |
| 9. |
Click on the Filter button to filter the Audit Trail report. It will show filtered data into the grid. |
 |
How do I export the audit trail of Claim Management?
| 1. |
Login to your account using your current username and password. |
|
| 2. |
Click on the Asset / Lease Management Tab. |
|
| 3. |
Hover on Claim Management. |
|
| 4. |
Select the APU tab. |
|
| 5. |
Select Client. |
|
| 6. |
Go to the end of that row and click on the view icon. It will open a new window. |
|
| 7. |
Click on the Audit Trail button. It will open the Audit Trail page in a new window. |
|
| 8. |
Select filter types to filter the Audit Trail Report. Like filter by keyword, filter by operations, filter by date, filter by the client, etc. |
|
| 9. |
Click on the Export button. |
 |
| 10. |
It will show you Popup asking whether you want to open or save the file. |
 |
Note:- If you do not see this option appear it is due to access restrictions for your user account. please contact an administrator.
|
Lauren Partridge
Comments