|
Table of Contents : |
How do I add Digital Signature Only?
| 1. | Login to your account using the username and password provided. | |
| 2. | Hover Over the Users tab and Click on the Users tab. |  |
| 3. | Select the user from the grid for whom you want to allow to FLYsign. |  |
| 4. | Click on EDIT button. |  |
| 5. | Edit the option ‘User to FLYsign’ from 'No' to 'Yes'. |  |
| 6. | Select Digital Signature Only from the list. | 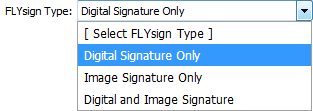 |
| 7. | Enter Personal ID number that you want to keep as a Signature. |  |
| 8. | Select FLYsign Level from the list. | 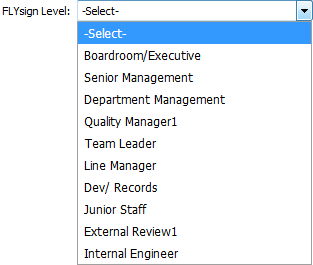 |
| 9. | Select FLYsign Authorisation, Sign Status Sheets and Allow to Verify Signatures from 'No' to 'Yes'. | 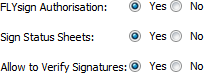 |
| 10. | Click on SAVE button. |  |
| 11. | It will show you Popup window. Click on the OK button. | 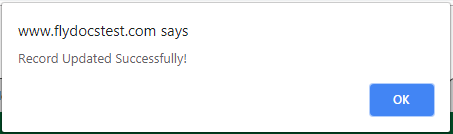 |
How do I add Image Signature Only?
| 1. | Login to your account using the username and password provided. | |
| 2. | Hover Over the Users tab and Click on the Users tab. | |
| 3. | Select the user from the grid for whom you want to allow to FLYsign. | |
| 4. | Click on EDIT button. | |
| 5. | Edit the option ‘User to FLYsign’ from 'No' to 'Yes'. | |
| 6. | Select Image Signature Only from the list. | 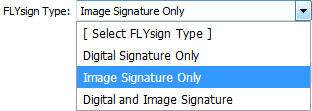 |
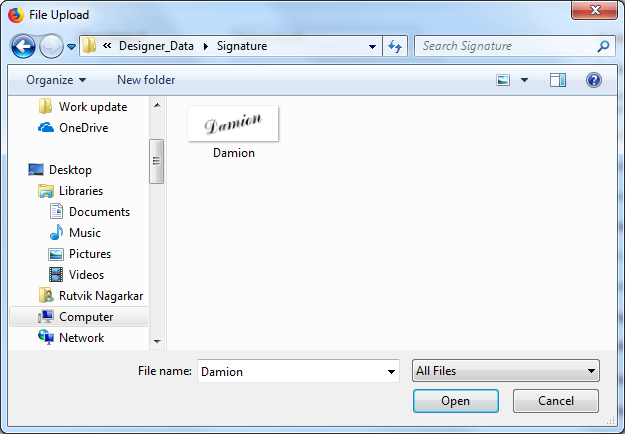
| 7. | Go to Image Signature and Click on the Browse button. |  |
| 8. | It will open File manager then Select image that you want to keep as a signature and Click on the OK button. Note: Image size should be 250KB to 645K and Image format should be PNG or JPEG. |
 |
| 9. | Select FLYsign Level from the list. | |
| 10. | Select FLYsign Authorisation, Sign Status Sheets and Allow to Verify Signatures from 'No' to 'Yes'. | |
| 11. | Click on SAVE button. | |
| 12. | It will show you Popup window. Click on the OK button. | |
How do I add Digital and Image Signature?
| 1. | Login to your account using the username and password provided. | |
| 2. | Hover Over the Users tab and Click on the Users tab. | |
| 3. | Select the user from the grid for whom you want to allow to FLYsign. | |
| 4. | Click on EDIT button. | |
| 5. | Edit the option ‘User to FLYsign’ from 'No' to 'Yes'. | |
| 6. | Select Digital and Image Signature from the list. | 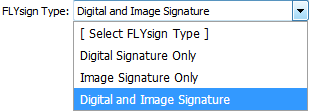 |
| 7. | Enter Personal ID number that you want to keep as a Signature. | |
| 8. | Go to Image Signature and Click on the Browse button. It will open File manager then Select image that you want to keep as a signature. Note: Image size should be 250kb to 645kb and Image format should be png or JPEG. |
|
| 9. | It will open File manager then Select image that you want to keep as a signature and Click on the OK button. Note: Image size should be 250KB to 645K and Image format should be PNG or JPEG. |
|
| 10. | Select FLYsign Level from the list. | |
| 11. | Select FLYsign Authorisation, Sign Status Sheets and Allow to Verify Signatures from 'No' to 'Yes'. | |
| 12. | Click on SAVE button. | |
| 13. | It will show you Popup window. Click on the OK button. | |
How do I give authorisation for FLYsign?
| 1. | Login to your account using the username and password provided. | |
| 2. | Hover Over the Users tab and Click on the Users tab. | |
| 3. | Select the user from the grid for whom you want to allow to FLYsign. | |
| 4. | Click on EDIT button. | |
| 5. | Edit the option ‘User to FLYsign’ from 'No' to 'Yes'. | |
| 6. | Select FLYsign Type, FLYSign Level and Other relevant details. | 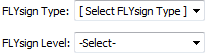 |
| 7. | Select FLYsign Authorisation from 'No' to 'Yes'. |  |
| 8. | Select Allow to Verify Signatures from 'No' to 'Yes'. Note: If User wants to Verify the Signature, then Click on Yes to Allow to Verify Signature. |
 |
| 9. | Click on SAVE button. | |
| 10. | It will show you Popup window. Click on the OK button. | |
How do I allow user to Sign Status Sheets?
| 1. | Login to your account using the username and password provided. | |
| 2. | Hover Over the Users tab and Click on the Users tab. | |
| 3. | Select the user from the grid for whom you want to allow to FLYsign. | |
| 4. | Click on EDIT button. | |
| 5. | Edit the option ‘User to FLYsign’ from 'No' to 'Yes'. | |
| 6. | Select FLYsign Type, FLYSign Level and Other relevant details. | |
| 7. | Select Sign Status Sheets from 'No' to 'Yes'. |  |
| 8. | Select Allow to Verify Signatures from 'No' to 'Yes'. | |
| 9. | Click on SAVE button. | |
| 10. | It will show you Popup window. Click on the OK button. | |
|
Note:- If you do not see this option appear it is due to access restrictions for your user account. please contact an administrator. |
Lauren Partridge
Comments